Monday, May 2, 2011

Order of Assembly

is important.


Need I say more?

I hadn't expected installing the laundry chute to be simple, so let's buckle down to work.

First, the hole.  You can see the 2 x 4 the chute was resting on in that picture above.  And if you look especially carefully you can see a small wedge of the steel support column sticking out from under it.

You don't have to look carefully at all to see the mess in the basement.


Here is that column.  The bent corner to the left is the one in the way.


Same corner, one reciprocating saw minute later.  That steel might have been 1/8" thick, but it wasn't hardened so it sliced like butter.


Now lets make a hole in the hall wall.

Marked


Cut

From the other side


We knew from that very first photograph that sheetrock would have to give, so lets get on with it.


I didn't even get to finish the sheetrock before damaging it!


Closer.  Still hung up on something.


There is the problem.  Wedged tight against the subfloor above.


A little coaxing with the recip saw later...


Ready for trim.


Ready for a cascade of clothes.  It shouldn't back up until the laundry pile is six feet high.


Patch the not-yet complete sheetrock.


As good as new.  Or at least it will be after six more coats of mud.

Sunday, May 1, 2011

Cabinets!

We finished assembling all the cabinets!  It made a world of difference to have Dad helping me.  I couldn't have assembled most of them without assistance.

Sink base cabinets for girls' bathroom.
 Notice the "dent" in the left hand one to go around the laundry chute.

Wall of cabinets for girls' bathroom
The bottom sections will have four drawers each (who ever heard of 16 drawers in a bathroom!).  The cubes will be open cubbies for the girls to put their stuff while getting ready.  No need to put clothes on the floor or counter!  The top sections will have shelves and—get this—doors.  We can stores stacks of towels without their tumbling onto the floor, and our guests won't have to see our cleaning supplies.

Cabinets for corner where sink was

The bottom section is a cabinet with two drawers (yes, 2 more).  Plenty of room for TP and whatever else is needed near the toilet.  Once again the center cubes are open.  Someplace other than the back of the loo to put those PJs while showering.  And the top section is shelves with doors.  Think "towels near the shower".

Flycatcher Nest

A pair of flycatchers decided to nest over our front porch while you were gone. The nest appears to be made from mud and moss. If you look very carefully in this picture you can see several little beaks pointing up.

Posted by Picasa

Saturday, April 30, 2011

Some Assembly Required

This morning I finished the first smoothing coat on all the sheetrock, but our real focus was on cabinets since that goes so much faster with two people.

Here is the proof that we ran a saw most of the day:


Perspective aids any cause.

Dad and I did finish all the cuts about 7 pm tonight.  Do you like my nice, neat stack?


We still had a little energy so we got started on the assembly.  We put together the laundry chute, the boys' vanity, and two of the pieces that go in the corner where the girls' sink used to be.


Tomorrow we will try to assemble the other ten units before Dad has to leave.

Thursday, April 28, 2011

Progress Report

Just a small update today. We concentrated on the sheetrock and have all the seams taped except for one corner in the boys' bath.

See how nice the skylight looks?
Posted by Picasa

Wednesday, April 27, 2011

Progress with Dad's Help

Dad and I have been working hard in the evenings.  We are focusing on cutting plywood for the cabinets while it is still light outside, and then after a bite to eat we work on mudding.

Here are the cabinets so far:


I know, they don't look like much.  That is about a third of the pieces we need.

Last night Dad just spotted the screws, but tonight he had to learn to tape corners since there are so many to do.  We are about halfway done with the seams.  I'd love to have them done, but half isn't bad for only two hours of work.


Dad has also been working on cabinets during the day.  These are the door fronts for the bunny boxes.  The lighter-brown ones in the back are the paper trays for the school room.  I can't wait to get that plastic thing off the counter!


Dad mounted the guides on all the drawers in the girls' room:


We decided we need to buy additional guides for those huge drawers at the bottom.  I'll order those when I order drawers for the bathrooms.

Doesn't your room look better with all that stuff moved back out, Eleanor?


Maybe not all that exciting.  We only have a few hours of serious productivity in the evenings, and the big change—installing the cabinets—has many hours of work before there is anything to see.

Saturday, April 23, 2011

Shades of Sheetrock

Today was sheetrock day!

Angela came over to help, and I doubt I could have done the ceiling without her.  It was great having someone to call out measurements, hold the other end of panels, and hand me all the tools I kept leaving in the wrong place.  She had to leave in the mid-afternoon, but by then all the ceiling was up (not including the skylight) and several important stretches of wall.  Plus she helped me move another load of sheetrock in from the car.

The boys' bathroom is completely rocked:


The girls bathroom is about 80% rocked.  I only have half the wall behind the toilet, the wall to the right of that, the wall behind the sinks, and the half-wall to the left of that.  I think I need to put the laundry chute before doing those last bits, so I plan to build and install that tomorrow.

Now you can admire the skylight:


Look at those trapezoids and guess how many trips up and down the ladder each one took.

WRONG!  They only took two each: one to make a paper template and one to install the finished piece!  I had a complete brainwave as I was about to start and thought, "There is no way in the world to measure those but if I could only trace the pattern on a big sheet of paper I could get the right the first time."  The roll of construction paper was right there, so a few staple and pencil marks later I had perfect templates.  And it was a very good thing, too, because the two sides actually have some curve to them because of the geometry.  It would have been impossible to check where the piece needed to be trimmed.  You had to start with a piece that fit and gradually curve it around to the final shape as you installed the screws.

Friday, April 22, 2011

Shades of Wonderboard

After weeks of wiring and plumbing I finally have something to photograph that looks like something.  The only challenge is backing up far enough to frame a decent picture.  The bathroom is not any bigger than it was before.


Wednesday, April 20, 2011

Right Tool for the Job

I finally figured out what this mixer attachment is for: mixing peanut butter!

I haven't had peanut butter in a month because I hate mixing the nice, healthy, no-trans-fats kind we get back into peanut butter from its constituent oil and sludge. It takes forever and the oil invariably sloshes over the side.

But not tonight! I got smart and decided to find a small mixing paddle. I found this one and it might as well have had a little tag that said: "For Mixing Peanut Butter". I can't figure out anything else it would be good for. No one needs a dough hook for one dinner roll.

Kids, put it in the right-hand mixer socket so that it pushes down.

PB&J for lunch tomorrow. But if I were with you I'd join you at Massimo's.
Posted by Picasa

Puzzled

Jesse, my boss who is leaving the company, told me about one of his favorite puzzles.  It consists of 16 square pieces with a tab or a slot on each side.  There are four different shapes of tabs and slots.  Your goal is to assemble the puzzle into a 4 x 4 square.  You can rotate or flip the pieces any way you want, but for the hardest challenge you have to assemble it using only the rough side or only the smooth side.

I figure there are over 2 x 10²² potential combinations if you do it the hard way.  Jeremy, you can write that number out in decimal notation and tell me whether it is big or little.

Being a tool-using monkey I stuck the pieces into an Access table, generated the list of 64 different piece/rotations that have to be considered,  wrote one query to come up with every valid combination of pieces into rows, wrote another to determine the valid combinations of those rows into 4 x 4 grids, and dumped the solutions to a spreadsheet.

There are 12 valid combinations if you don't allow yourself to flip any pieces.  This is one of the simpler ones—simpler because I didn't have to rotate many pieces from my baseline orientation.

Tuesday, April 19, 2011

Bunnies at Home

The bunnies were both in the box when I got home tonight. It would be a nice family photo, but Joy blinked.

Posted by Picasa

Sunday, April 17, 2011

Lazy Weekend

Somehow I had a little bit of trouble getting inspired to work this weekend.  I think it was the combination of jet lag, work stress, lack of sleep, and learning from the Italians that one doesn't have to be full speed ahead all of the time.  The end result was that this weekend was more of a "pottering" pace than some of the others have been.

The construction was not helped along by my day job.  I was so bothered by how little time I had to work on my big project last week that I decided to one big piece of it out of the way Friday night instead of starting into construction as I had been.  I ended up working until 2 AM.  Yes, that is the wild bachelor, out to all hours!  So not only did I not get any construction done Friday night, but for some reason I didn't get any done Saturday morning, either.

First up for the weekend was to finish the electrical rough-in.  I got the last bits of that done about noon today.  The wiring rough-in is done all the way back to the breakers.  Girls, I even replaced that malfunctioning smoke detector in your bedroom!

Wiring does not make for great photography, but here is a representative sample anyway.

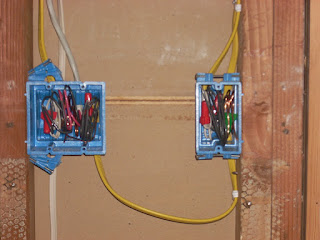
For lights and fan in the boys' bathroom

With wiring done I could clean up all the debris and tools and start getting the bathrooms ready for sheetrock.  It is amazing how long it can take to put away tools, pick up trash, and vacuum.  I needed my crew of young workers.

The other big milestone I was going for was the insulation.  I almost made it, which is pretty good considering that I didn't start until after lunch, stopped in time for 5:00 mass, and put in a double layer (R-30 on top of R-19) around plumbing, wiring, and a skylight.  The skylight insulation is done, as is all of the R-30.  I just have to finish putting the R-19 in from underneath.


That really is the ceiling.  I had the camera sideways.
I like the "touchable" pink insulation you see there!  It is the regular fiberglass insulation we are used to, but they put a very thin perforated plastic sheet around it.  It doesn't put nearly as much glass dust in the air and it doesn't shred every time you try to move it.  It was less that 10% more expensive than the unwrapped variety, and worth every penny.  But is isn't available with a vapor barrier.

Let's see.  I described the weekend as pottering, so let me list a few of the other necessary odds and ends:

  • Finished putting in all the drawer slides for the girls' rooms.
  • Started installing the drawers.
  • Cut off all the nail heads that used to hold up the mesh behind the tile.  Those nails were permanently bonded to the studs, wouldn't pull (the heads pulled off), and flush cutting was less likely to cause damage than hammering them flat.  This was an hour: there were a lot.
  • Insulated the hot water pipes in the walls and laundry room.
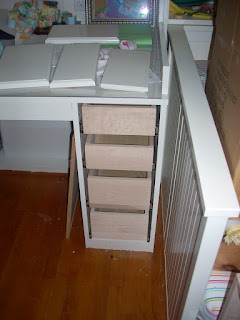
Eleanor has drawers.  W/o fronts.