Monday, February 28, 2011

Eleanor Doors

Eleanor's cabinet doors had become a combination dead body/horizontal surface:

I decided that I needed to do something about that, so tonight I sanded the first coats and put on the first coat of Miralo.  The good news is that it looks like there is enough for me to finish the job.  I really didn't want to have to procure another custom gallon from the one store in Atlanta that sells the stuff.


Vandal

Kids, ask the Italians about the Vandals.

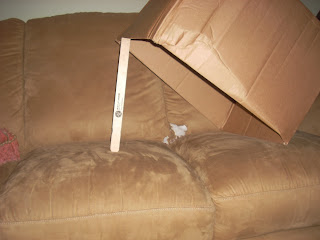
Last night when I cleaned the house I vacuumed the cushion guts off the sofa and removed the laundry baskets I was using to discourage a furry friend.  I also put a pillow over the hole so it would not be an obvious point of interest.  This is  what greeted me when I got home:


Someone pulled/cut/bit pieces off the pillow and then decided to make a serious burrowing attempt on the sofa.  I have a feeling that the someone fits this description:

Profile View
Front View


I think that negative reinforcement is called for. I thought about borrowing robo and turning it into a pellet gun with a motion detector, but that seemed too much like work and also I was afraid the perpetrator would chew robo, too, for dessert. Here is my first attempt.


Call me Elmer Fudd.

Remains of the Fountain

It was a stormy evening. Low black clouds, high gusts of wind, heavy rain. The storm came through right at rush hour. I got home just as the rain started coming down.

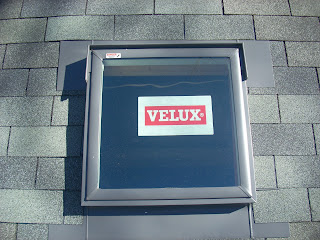
I looked out when it started raining really hard (after checking that the skylight wasn't leaking) and saw the downspout at the back corner of the carport doing a great fountain. It is jammed with leaves at the constriction at the bottom, so the water was shooting up through all of the joints.

Of course I couldn't stand for that, so I tried to remove the leaves. They were stuck for a reason. I couldn't pull them out, so I tried banging the pipe to get them moving. That worked a little, but before the clog broke free the banging also let the top section of the downspout come off. After that there didn't seem to be much point to removing the leaves.

Sunday, February 27, 2011

Another Quick Sunday

Where do the Sundays go?  Just when I feel like I am getting traction the weekend is over.  Or at least it is time to prepare for normal life by cleaning up, buying some groceries, and getting some much needed rest.

I am keeping this post short because I do not want to drag myself through this week like the last one.  Of course last week I was fighting a head cold and this week I am not.  It should be a good week.  It will be a good week.

I have not sweated the first coupling yet.  I thought about doing a few prep pieces just so I could say I started.  I am still grappling a three dimensional jigsaw puzzle made of wood, copper, and PVC.  Actually, it isn't a jigsaw puzzle: it is one of those mind-benders they sell over at The Kaleidoscope Store.  I am very close.  I have the fittings for the copper laid out and have started drilling holes.  I have most of the DWV fittings laid out, too, but I am missing a key one that Home Depot does not sell plus at least one other I discovered I needed 1 minute after returning from Home Deport.  I'll try Handy tomorrow.  They are more likely to have an oddball fitting.

Home Depot was a lesson in volume production and volume pricing.  Compare these two fittings:
3/4 in. Copper Pressure Cup x MIPT Male Adapter1/2 in. Copper Ftg x MIPT Fitting Adapter
The pictures are for two different sizes, but the ones I was looking at were exactly the same except for the smooth portion.  The one on the left is made to fit onto a 1/2" pipe.  That is a pretty common thing: I need four of them for the shower mixer control.  They sell for 0.98 each.  The one on the right is made to fit inside another 1/2" fitting, such as an elbow. That must be a less common need, because Home Depot charges 4.98 each for them.  Five times the price!

An hour of vacuuming tonight took care of the worst of the grit and dust problem.  It was pretty grim to walk around in our house for the last week.

Saturday, February 26, 2011

Light!

By the end of my second weekend of working on the bathroom I was completely depressed by the lack of daylight. Even our nice work light was having trouble illuminating the space, and having the same light at 10am and 10pm just did not work for me. I think the girls will like the result.

Step 1 was to figure out whether I could make it work.  It isn't easy to look at an interior space to see where a skylight needs to go, then translate that to a spot on the roof to see whether it can actually go there.  The roof concern was whether I would be attempting to put a skylight at the point where the roof changes pitch.  I have never seen a hinged one.

Step 2 was to order Velox's smallest skylight in the style we got for our bedroom.  I wanted small because this is a small space and the skylight will get some afternoon sun.  The one I got is still plenty big: about 20" x 20".

Step 3 was to do more thinking.  I needed to place the skylight high on the roof (i.e. towards the hallway side of the bathroom) to avoid the lower-pitched part of the roof.  How high was limited by support running perpendicular to the rafters and by the need to actually have the skylight over the bathroom and not the hallway.  I also wanted the light shaft to be close to vertical on the hallway and living room sides to that the aforementioned afternoon sun reflects off the light shaft instead of beating on the floor.  Finally the other two sides of the light shaft needed to open wide to spread the light over the sinks and into the back chamber.

I picked up the skylight this week and started the interior construction last night.

This is the starting point.  I took this picture from the floor
with my feet towards the door.

Three hours later.
Taking the extra ceiling joists and rafters out wasn't easy.  It was like each cut required a different tool because the obstacles were different.  Framing the rough opening afterwards wasn't easy either, but mostly because I bent a lot of nails working on 40-year lumber and hammering around obstacles.  The work did get easier as I went because I opened the space up so much.

Doing the interior rough-in last night put me in a position to enjoy a beautiful morning outside.

First clear a space around the nails poked from the inside.

Have to go through the tar paper, too.

Rough hole so I can see where the exact edges need to be.
Notice the new toy.

Skylight positioned over squared up hole.

And now it looks like it has been there forever.
Except for the sticker.
Good grief!  Who put all that stuff on the roof!

That's better.

After a very late lunch I did the one other nice touch.  This is the wall over the doorway to the loo chamber:


And this is the same doorway framed for a glassed opening so some of that nice daylight will be available for potty reading.


My new toy did make quick work of that opening.  The hammer and crowbar are great when the whole wall needs to come out, but the reciprocating saw is much better for removing just a few pieces, especially when it would be really easy if you could just cut through the nails, too.  Just don't ask it to cut a straight line.  Rule of thumb: if you went through the trouble to mark a line, the reciprocating saw is the wrong tool.

Thursday, February 24, 2011

In Case You Tried To Call

Apparently this past weekend I inadvertently joined the ranks of people without a home telephone line. I tried to make a call tonight only to find that the line was dead. At every phone in the house.

After some searching I found where I had knocked a connector loose in the basement, presumably when I was busy knocking down pipes.

So if you know anyone who was trying to reach me...

Yesterday's Workout

Yesterday I decided it was time for a decent workout.  These are "before" pictures:


And these are the "after" ones:


OK, it doesn't look as impressing in the picture as in real life. But considering that the 20-yard roll-off is half full I moved 10 cubic yards of HEAVY rubbish in about an hour an a half.

Tuesday, February 22, 2011


I needed a 4-foot level for this project (it is hard to level a 5' tub with a 6' level) and I couldn't resist one so fancy that it comes with a soft-sided carrying case and a serial number.

This thing has a backlit digital readout, in degrees, pitch, or inches/foot, that reads right-side up or upside down. To within a tenth of a degree. It has audio feedback that beeps faster as you approach level or plumb. It can remember an angle so you can match it somewhere else. It is self-calibrating. And it projects a laser point so you can extend the angle to a far wall. The silly thing told me the temperature when I turned it on.

Sorry the picture is blurry. Apparently the camera thought the chair in the foreground was more interesting.
Posted by Picasa

The Laundry Room Mess

I don't think I ever showed you the mess waiting for me Sunday. This was AFTER I carried out the old shower curtain I had used to catch the nastiest of the debris from pulling apart them pipes.

Yep, a whole laundry room of small rubble that sifted through the old subfloor and around the pipes. I had to clean it up so I could get to the dryer barefoot.
Posted by Picasa

Mental Heavy Lifting

Not much to show for the last few days other than lots of scratch paper and some credit card charges from online vendors.  Now that everything is torn apart enough for me to see what I'm working with I'm making sure all the puzzle pieces fit together.  In some cases that means finding and buying the right puzzle piece.

One I took care of tonight was, of all silly things, the vent fan.  I know it doesn't sound like much, but it took a bit of shopping to find the quietest one that moved enough CFM and worked with the existing 4" duct.  Ashley, you will be pleased to know that I got one that turns on automatically when the humidity goes up.  No more moldy steam room.  Sorry, they haven't invented one that detects "aromatic organic compounds".

I also decided how to make a 60" tub fit in a 61" space.  Better than the other way around, but typically one wants the tub to reach the tile wall.  That also meant serious boning up on tile substrates, waterproof membranes, etc.  I have decided in this case to use Hardiboard with a Kerdi waterproof membrane.  I'll show you pictures as it goes in.  A while from now.

Still need to figure out a good light fixture for the back chamber.  I found this one online.  What do you think?
Kichler Lighting Ravenna Baroque Old World 21-Light 3-Tier Chandelier

Saturday, February 19, 2011

Subfloor

I'm posting this out of order.  This was my work from the morning.

This was the front section of the bathroom.  Watch your step.  There is nothing under that insulation, and the joists are covered with Liquid Nails.


That's better.  Decking going in place.  I bent every other nail until I pulled out the big daddy hammer.


This hammer.  Now the floor is done in the front and it is time to start the back section.


I decided to pull out the insulation under the back section and start over.  Otherwise we would have to put of with a rain of grit, mortar, and chips of tile forever in the basement.  It had worked its way into the insulation and sifted down with each bump or footfall.

Do you like the spiderweb?


Here it is with clean insulation back in place and ready for the first layer of subfloor.  First of three.  I have to build it up roughly level with the other floor.  I am not putting down a 2" layer of mortar.


So can you believe that this was ever a bathroom?  Or ever will be again?

I'm Tired

I got back from Home Depot at 5:30 with $750 of lumber, ductwork, and pipe fittings.  I filled three carts!  After unloading the van I had a couple of sandwiches for dinner and then got back down to work.  Since it was getting dark I decided to deal with ductwork and destroying the cast iron drains instead of continuing the subfloor.  I didn't want to cut outside after dark and disturb the peace.

It took about three hours to move the duct to the boys' bathroom.  It had to be moved because the laundry chute is going through its old location.  If you are trying to remember which one it was, it was the low one running diagonally across the laundry room.  It was so low that I regularly brushed my head on it while going to the washing machine.

Here is the old duct coming down:


Here is the new one part way up.  I will have to find a new location for the paintbrushes.


And here is the final result.  You can't even see it behind that return.  Just a little bit on the left as it goes up over the shelves and again on the right as it goes across the top storage shelf.  It it goes up and over that return.


Having done that I decided I was nasty enough that I might as well get the last really bad project out of the way.  Luckily for you I don't have too many pictures of my progress.  Here is the one I took:


Yes, those are bits of string and hair and biofilm hanging down.  It wasn't at nasty as it could of been.  Most of it was dry since I cut off the water to the bathroom three weeks ago.

Taking out cast iron is HARD WORK.  First you have to break it apart.  Mostly this involves shattering with with multiple hammer blows.  Sometimes you are lucky and you the pipe breaks through under 10 or 20 blows of the small sledge hammer.  In some places I needed over a hundred blows to get the break I needed, because I was breaking a stronger piece, working at a funny angle, or both.  I hard to take breaks to catch my break and to let my safety glasses unfog.  You definitely want safety glasses.  Pieces of metal go everywhere, often at high speed.

When you finally succeed in breaking the pipe you have a different problem: a very heavy section of pipe falling.  You have to plan ahead: What will the pipe be supported by when it breaks?  How heavy will the section be?  Will it have an awkward center of gravity because of the intact branches?  For the 4" pipes I aimed for sections 3-4 feet long because that was the most I was comfortable controlling and carrying out to the dumpster.  Oh, the dumpster:


It is still mostly empty because I can load it weeknights.  I need to save my weekends for the bigger inside projects.

I finished the cast iron workout about midnight and took a nice, long shower.  By taking out the cast iron I am ready to start the plumbing rough-in tomorrow.  Luckily I can't start that until after Home Depot opens in the morning.  I got most of the fittings today, but not any of the pipe.

It is fairly important that I get the DWV (Drain Waste Vent) system back together because right now the two vents through the roof have no waste line under them.  Sewer gases are still vended outside through the kitchen and a sideways access to the largest vent from our bathroom.  But I'd rather not have rain coming through the vents.

Thursday, February 17, 2011

On the way to Andretti's

This evening the IT department headed out to Andretti's, an indoor go-cart track in Roswell.  As I battled through stopped rush-hour traffic in Alpharetta I noticed a familiar profile in the car behind me.  Christopher!  I called him to say hello and ask what he was doing behind me.

What is the probability?

I Wonder Who Did That


This was the view of the sofa this morning.

It might be a bit of a stretch to prove, but I think it might have been Joy since Smudge has trouble clearing the edge of his litter box these days.

I have now adorned the sofa with empty clothes hampers to discourage further "fun". They had to be empty because I also found out that someone had chewed holes in several clean undershirts. Ones in the bottom of the basket, not ones hanging over the edge.
Posted by Picasa

Wednesday, February 16, 2011

Well, she is Magic...

Don't ask me how she got it in there.
Posted by Picasa

RV?

I took a cue from Grandpa Jim and added some fixtures to the van:


I decided they took up too much room there so I put them in the house instead:


The remarkable thing is that I loaded and unloaded the van by myself.  The toilet is pretty heavy--it is a one-piece model--but for the most point I kept the weight on the ground by leaning it up on a corner.  The tub might actually be lighter.  It certainly is for its size and it was pretty easy to move around by the handles on the box.  I'll be able to put it in place myself very easily.

Sunday, February 13, 2011

Floorplan Change

I have decided that the sinks need to go on the other wall.  It works out better for the way the subfloor changes have to happen, the plumbing is easier, I don't have to mess with the wall  to the living room, and I can do it without building a dummy wall to hold the plumbing (half of that other wall butts up against the boy's shower and is already 8" deep.

It does mean reversing the swing of the bathroom door.  The advantage there is that the nice, new granite vanity top will be visible from the front hall.  The disadvantage is that so will Eleanor if she is still getting dressed when her boyfriend arrives.  I guess the girls will have to have a little discretion in when they leave the bathroom door open.

Removing the Subfloor

Sorry I don't have oodles of pictures for you today.  It was a short day, and a day of trying to figure out exactly how I was going to deal with the subfloor besides.  Do I knock down the wall or cut the subfloor boards off at the wall?  If I cut the boards off at the wall is it still supported by anything?  Are there other reasons I need to mess with this wall, like shower alcoves, plumbing runs, and medicine cabinets?  If I take that out what else has to come out first?

In the end I have decided to try to proceed with most of the walls still in place, and to replace only the broken board under the bathtub.  Here you see the subfloor at the end of the day:


Notice that if I am a bit sleepy when I open the door to the bathroom I can take the shortcut to the laundry room.  There is nothing substantial under that insulation.


I am leaving the original subfloor on the left and right because it will be under the cabinets and because I need it to hold up the walls.  I am making the transition at a joist so both the plywood and the diagonal one-by's can be nailed down.

About now you should be wondering how I am flush-cutting the ends at the wall.  I tried a chisel.  That worked well as long as the board wasn't bouncy.  Most of the boards were bouncy, and a chisel makes no progress when it bounces.  I tried hand saws.  That is VERY hard work at bad angles and you have to be careful not to cut wires underneath.  I tried a special flush-cut hand saw (short straight blade offset from the handle so you don't bash your hands.  It might have works if the manufacturer had bothered to sharpen it.  Finally, I tried...


The Dremel Multi-Max oscillating tool.  Yes, that little, dinky machine with a 3/4" wide flush cut blade is my best tool for this big, nasty job.  It literally work by vibrating.  It feels like a cross between the hair clippers and an electric toothbrush.  But the blade is this and the oscillating really does let it cut through wood.  It seems impossibly slow, but it is faster than both chiseling and hand-sawing, takes a lot less effort, and leaves a clean edge.  I can cut one board in about 5 minutes.

As you might have guessed by now today included a trip to Home Depot.  In addition to the Dremel I also got a load of plywood subflooring, 2x4's, and 2x6's.  It is just as well that I didn't finish the tear-out though: I forgot about screws and liquid glue.

Oh, Joy!

Funny that you should ask about Joy in your comments this morning. When I got up she was on the sofa taking the fringe off a pillow and starting this hole in the back.

So in other words the construction does not seem to be putting her off her stride.
Posted by Picasa